Event-base Microservices Implementation Guideline
These recommended are introduced to help to keep microservices' source code standard, human readable, easy to test and maintain.
the recommendation are meant to fit the technology stack being used:
Spring Cloud
Confluent Kafka
HashiCorp Vault
Docker-compose
The main architectural patterns revolves around Event Driven Architecture with:
Kafka to decouple microservices and implement asynchronous communications
Schema Registry to allow contract between microservices to evolve and yet be retro-compatible and support different client versions
Stream Processing to create, transform, and persist Aggregates
where we use Hexagonal Architecture only to logically structure microservices around communication channels, backed system, and business functionally. We will not break down the code in sub-modules and different port, adaptors and application artefacts. The ultimate is to be able to run the application in a fully automated mode and yet keep the code simple to read and maintain.
REST AP to:
load stale state
Allow communication with external Systems
Useful resources:
Source Code
Java Package Structure
This s an example of commonly use naming convention for Java packages:
where:
[reversed.domain.name] is the company reversed Internet domain name, so to avoid conflict with worldwide writing classes.
[department_name] is used to avoid collisions between departments in the same company
[functional_area] is used to avoid collisions between functional area in the same department
[application_name] is used to avoid collisions between Git Repositories/application
[department_name], [functional_area] and [application_name] follow the below conventions:
all lower case to avoid conflict with the names of classes or interfaces.
only alphanumeric and underscores (_) characters are allowed.
packages cannot begin with a number.
For common/shared libraries it is possible to follow the following convention:
or
Project Structure

Models & DTOs
The various models of the application are organised under the model package, their DTOs(data transfer objects) are present under the dto package. There are different opinions about whether we should use DTOs or not, I belong to the set of minds who think we definitely should and not using DTOs makes your model layer very tightly coupled with the UI layer and that is something that no enterprise project should ever get into.
DTOs let us transfer only the data that we need to share with the user interface and not the entire model object that we may have aggregated using several sub-objects and persisted in the database. The mapping of models to the DTOs can be handled using ModelMapper utility, however its only useful when your DTO is almost similar (literally) to the concerned models which is not always the case and hence I prefer using custom mapper classes. You can find some examples under the “dto/mapper” package.
For ex, let’s take a look at how our Trip.java model is organised :
Trip.java
As we can see the model has references to the Stop, Bus and Agency collections. This is required to maintain the relationship between these various collections with a Trip. While this is not the same as a foreign key concept in MySQL and there is no default cascading applied here, it does give us a way to emulate the same in MongoDB. The corresponding data transfer object looks as follows :
TripDto.java
As I described earlier, DTOs are not meant to be the mirror image of their model counterparts, rather they should be a reflection of what the user interface or the api response demands. In this case there was no sense in making a composition relationship between a Trip and its Bus or Agency or the Stops, rather their primary keys actually can do the trick. This not only decouples these DTOs, it also reduces the overall size of the response packet that will travel over HTTP from server to the client.
The very next question can be how to convert the model POJO to this DTO, well there are more than one ways to do it but my preference is to be explicit and DIY as follows :
Services and DAOs
The data access objects (DAOs) are present in the repository package. They are all extensions of the MongoRepository interface helping the service layer to persist and retrieve the data from MongoDB.
The service layer is defined under the service package, considering the current case study it made sense to create two basic services :
UserService and
BusReservationService
Explaining each method in these services is out of the scope of this blog post, however I will list out the interfaces showing the operations supported by these services.
UserService.java
BusReservationService.java
Apart from noticing the method naming conventions, I am sure you have noticed that the service layer never accepts a model as input and never ever returns one either. This is another best practice that Spring developers should follow in a layered architecture. The controller layer interacts with the service layer to get a job done whenever it receives a request from the view or api layer, when it does it should not have access to the model objects and should always converse in terms of neutral DTOs.
When the service receives a DTO object, it should try to make sense out of it by querying for the corresponding model object from database and then do the necessary operation and create a response DTO to be sent back to the calling service. This approach lets you change the view and models independently without having to worry one might break the other.
To illustrate the aforementioned approach, let’s take an example of a service operation “updateProfile” that is used to update user’s information. The method definition look as follows :
Security
The security setting are present under the config package and the actual configurations are done under the class present in the security package. The application has different security concepts for the admin portal and the REST APIs, for the portal I have applied the default spring session mechanism that is based on the concept of sessionID and cookies. For the REST APIs I have used JWT token based authentication mechanism.
The security for web and apis are configured both in the same class MultiHttpSecurityConfig.java. It has two static classes extending from WebSecurityConfigurerAdapter which let’s us configure the http security for incoming requests.
The @Order annotation allows the requests to be scanned through the different configurations in the specified order. So an API request goes through the ApiWebSecurityConfigurationAdapter and gets absorbed there, however an Admin request first goes through it but since it doesn’t match the criteria Spring Security tries to make it go through the next configuration with an immediate higher order which in this case is FormLoginWebSecurityConfigurerAdapter.
The API requests have to go through the ApiJWTAuthenticationFilter and ApiJWTAuthorizationFilter which are responsible for the creation and validation of the JWT token issued at the time of login. If you are wondering which URL should be used for API authentication (login) then here it is :
http://localhost:8080/api/auth
And if you are wondering how this was configured, then the answer lies in the class ApiJWTAuthenticationFilter, its constructor has the following information coded :
This tells AbstractAuthenticationProcessingFilter to hook the AuthenticationRequestMatcher with “/api/auth” path for the API requests.
The admin application is only allowed for those users whose role is “ADMIN”. All the passwords are encrypted using BCryptPasswordEncoder and we can never see their actual value once they are stored in the database.
Controllers
Last, but the most important part is the controller layer. It binds everything together right from the moment a request is intercepted till the response is prepared and sent back. The controller layer is present in the controller package, the best practices suggest that we keep this layer versioned to support multiple versions of the application and the same practice is applied here.
For now code is only present under v1 but over the time I expect to have different versions having different features. The Admin portal related controllers are present in the ui package and its concerning form command objects are located under the command package. The REST API controllers are located under the api package and the corresponding request classes are located under the request package.
The admin panel controllers work on the Spring WebMVC concept. They respond to incoming web requests with Spring’s ModelAndView objects containing the data to be shown on the concerned views/forms and the name of the view to be rendered, an example from DashboardController class is as follows :
Request and Form Commands
Again, there are different opinions amongst the developer community regarding the usage of separate classes for mapping the incoming request vs using the DTOs vs using the models directly, I am personally a fan of segregating them as far as possible to promote loose coupling amongst UI and controller layer.
The request objects and the form commands do give us a way to apply an additional level of validations on the incoming requests before they get converted to the DTOs which transfer valid information to the service layer for persistence and data retrieval. We could use DTOs here and some developers prefer that approach as it reduces some additional classes, however I usually prefer to keep the validation logic separate from the transfer objects and hence am inclined to use the request/command objects ahead of them.
An example command pattern based class BusFormCommand looks as follows :
And an example of a request sent via API, BookTicketRequest is as follows :
The static resources are grouped under the resources directory. All the UI objects and their styling aspects can be located here.
Lombok
One of the biggest complaints against Java is how much noise can be found in a single class. Project Lombok saw this as a problem and aims to reduce the noise of some of the worst offenders by replacing them with a simple set of annotations. You will find Lombok employed everywhere in this starter kit, it has actually helped in reducing the lines of code, save a lot of development time and effort and make the code a lot more readable. Some of the most important annotations that I prefer using are :
@Getter /@Setter
Never write public int getFoo() {return foo;} again.
@ToString
No need to start a debugger to see your fields: Just let lombok generate a toString for you!
@EqualsAndHashCode
Equality made easy: Generates hashCode and equals implementations from the fields of your object..
@Data
All together now: A shortcut for @ToString, @EqualsAndHashCode, @Getter on all fields, and @Setter on all non-final fields, and
@RequiredArgsConstructor!
In essence, something as verbose as :
Could be written simply as :
You can very well see the difference, not only the later looks much cleaner, we have come down from 59 lines of boring POJO to a 8 lines based java class file.
API Response and Exception Handling
I have tried to experiment a bit with the RuntimeExceptions and come up with a mini framework for handling the entire application’s exceptions using a few classes and the properties file. If you carefully observe the exception package, it consists of two enums :
EntityType and
ExceptionType
The EntityType enum contains all the entity names that we are using in the system for persistence and those which can result in a run time exception. The ExceptionType enum consists of the different entity level exceptions such as the EntityNotFound and DuplicateEntity exceptions.
The BRSException class has two static classes EntityNotFoundException and DuplicateEntityException which are the two most widely thrown exceptions from the service layer. It also contains a set of overloaded methods throwException which take the EntityType, ExceptionType and arguments to come up with a formatted message whose template is present under the custom.properties file.
Using this class I was able to empower the entire services layer to throw a variety of entity exceptions in a uniform manner without cluttering the code base with all sorts of NOT_FOUND and DUPLICATE entity exceptions.
For example, while login if you try to use a email address which is not registered, an exception is raised and thrown using the following single line of code -
This results in clubbing the names of these two enum elements USER(“user”) and ENTITY_NOT_FOUND(“not.found”) and coming up with a key user.not.found which is present in the custom.properties files as follows :
By simply replacing the {0} param with the email address included in the thrown exception you can get a well formatted message to be shown to the user or to be sent back as the response of the REST API call. The definition of the BRSException class is as follows :
Another important part of this mini framework is the CustomizedResponseEntityExceptionHandler class which looks as follows :
This class takes care of these RuntimeExceptions before sending a response to the API requests. Its a controller advice that checks if a service layer invocation resulted in a EntityNotFoundException or a DuplicateEntityException and sends an appropriate response to the caller.
Last, the API response are all being sent in a uniform manner using the Response class present in the dto/response package. This class allows us to create uniform objects which result in a response as shown below (this one is a response for the “api/v1/reservation/stops” api) :
And when there is an exception (for example searching for a trip between two stops which are not linked by any bus) the following responses are sent back (result of “api/v1/reservation/tripsbystops” GET request) :
As you can observe, both type of responses, one with a HTTP-200 and another with HTTP-404 the response payload doesn’t change its structure and the calling framework can blindly accept the response knowing that there is a status and a error or payload field in the JSON object.
API Documentation
It is as important to document your work (as is its development) and make sure your Spring Boot APIs are available in a readable manner for frontend teams(internal) or external consumers. The tool for API documentation used in this starter kit is Swagger2, you can open the same inside a browser at the following url -
http://localhost:8080/swagger-ui.html
It will present you with a well structured UI which has two specs :
User
BRS
You can use the User spec to execute the login api for generating the Bearer token. The token then should be applied in the “Authorize” popup which will by default apply it to all secured apis (get and post both). Please bear in mind that you should append the word “Bearer” followed by a space, in front of the token before applying it in the authorize dialog box.
The configuration of Swagger is being taken care of by class BrsConfiguration. I have defined two specs there with the help of “swaggerBRSApi” and “swaggerUserApi” methods. Since the login part is by default taken care of by Spring Security we don’t get to expose its apis implicitly as the rest of the apis defined in the system and for the same reason I have defined a controller in the config package with the name “FakeController” :
Its purpose is to facilitate the generation of swagger documentation for login and logout apis, it will never come into existence during the application life cycle as the “/api/auth” api is being handled by the security filters defined in the code base. Here are some sample screenshots to help you visualise things a little better :![]()
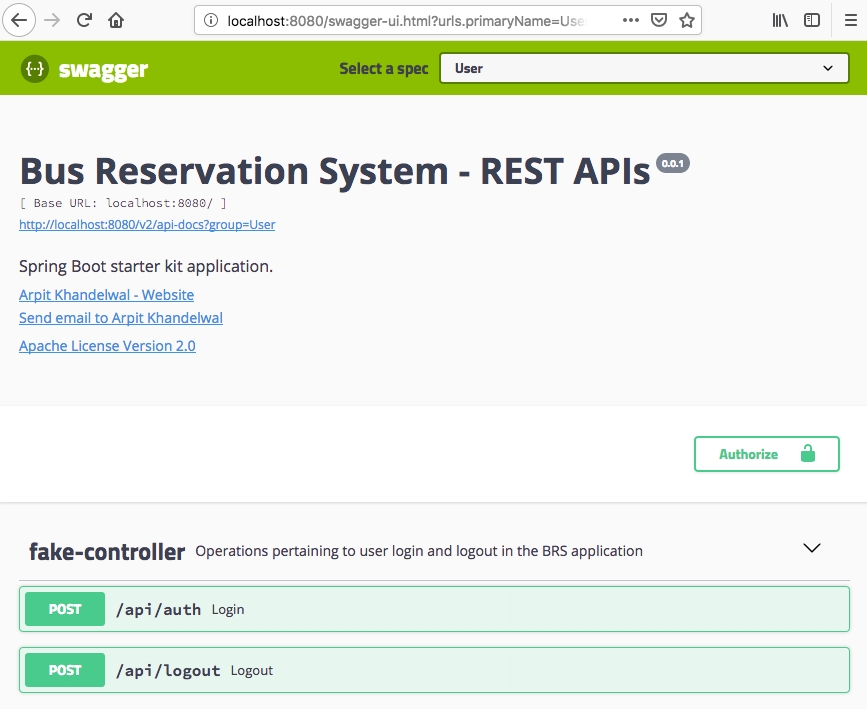 Swagger UI
![]()
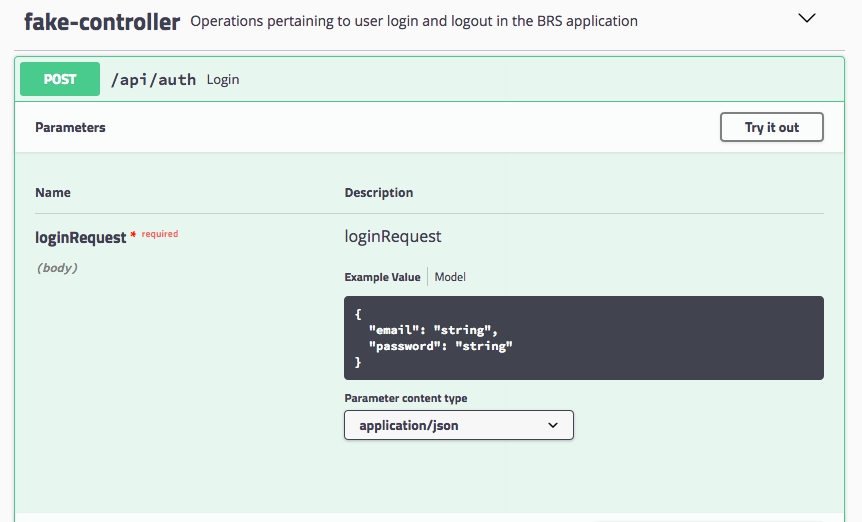 /api/auth login, courtesy FakeController
![]()
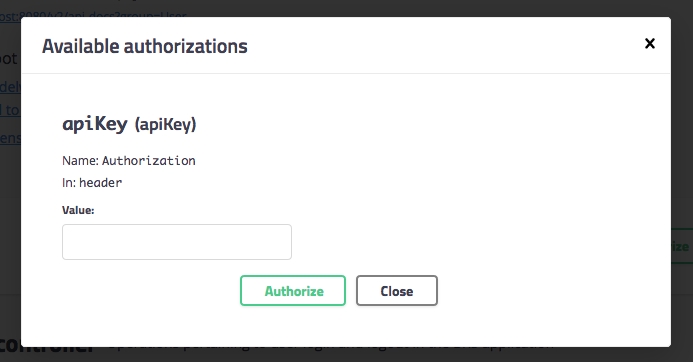 Authorize dialog for registering Bearer tokens
![]()
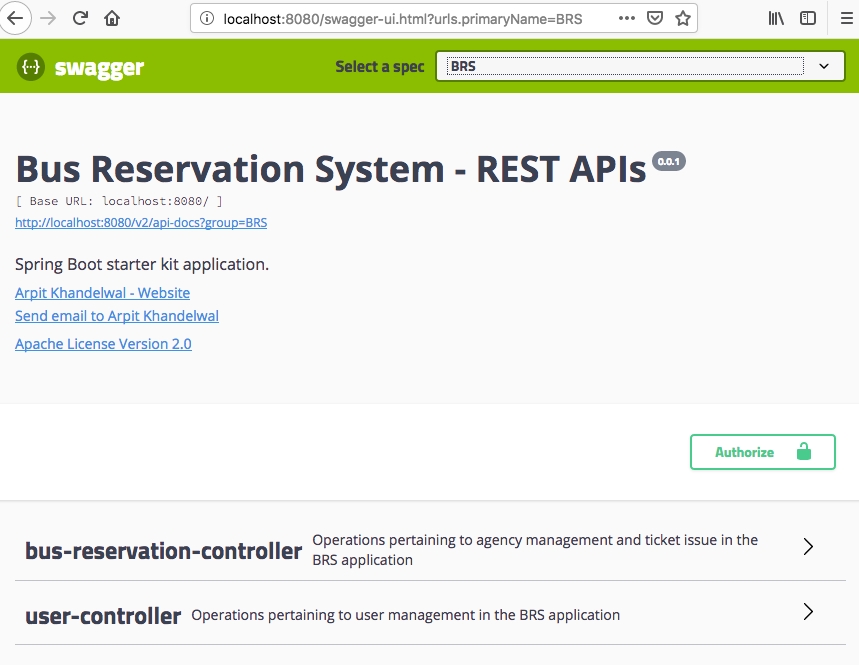 BRS APIs
![]()
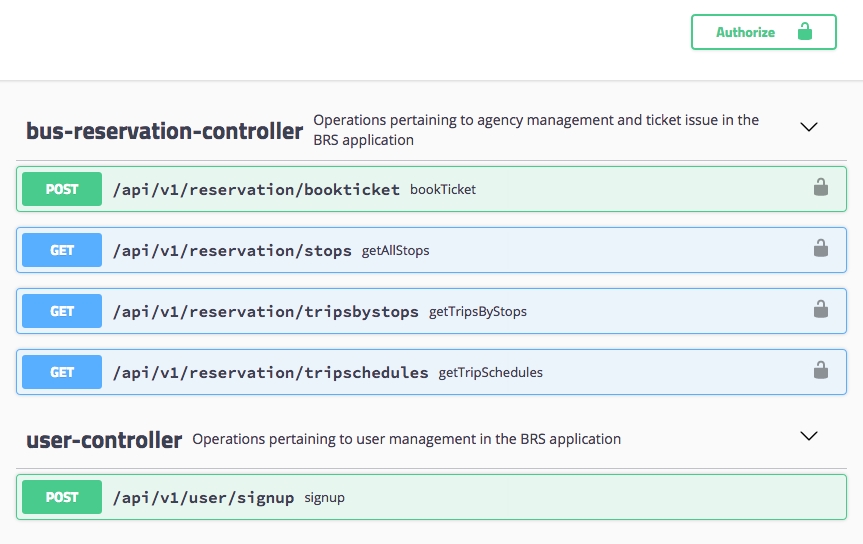 BRS APIs listed out
To use the Swagger UI and execute the secured APIs, you will need to first operate the “/api/auth” from the User spec and generate a Bearer token. Once the token is issued, you can register it in the Authorize popup and then move on to the BRS spec to execute the secured APIs. If you don’t register the token then you will keep on receiving the HTTP 401 error.
You may get into issues while trying out the Swagger-Ui for those HTTP-GET requests which have a body with parameters, don’t worry it’s not the fault of the code it is Swagger’s decision to stop supporting body params for GET and DELETE requests. As a workaround, you may copy the curl request from swagger and execute it inside a terminal window and that should work fine or you may opt to go for Postman or a similar tool as they don’t (yet) enforce such a tight restriction. In my views, as long as the Open API specifications don’t restrict the body params in GET requests, tools like Swagger shouldn’t too, however its a call that they need to make and not us as developers.
UI Architecture
The user interface for the admin portal is designed using material design with the help of Bootstrap and responsive web app concept. The UI is server side rendered using Thymeleaf templates (preferred templating engine in Spring).
The standard way of working with Thymeleaf is to use includes. This quite often leads to repetitive code, especially, when a website has many pages and each page has several reusable components (e.g. header, navigation, sidebar, and footer). It is repetitive as each content page has to include the same fragments at the same locations. This also has a negative effect when the page layout changes, e.g. when putting the sidebar from the left to the right side.
The decorator pattern used by the Thymeleaf Layout dialect solves these issues. In the context of template engines, the decorator pattern doesn’t work with includes on content pages anymore, but it refers to a common template file. Each page basically only provides the main content and by describing which basic template to use the template engine can build the final page. The content is being decorated with the template file.This approach has advantages compared to the standard way of including fragments:
The page itself only has to provide the content.
As a template file is being used to build the final page global changes can be applied easily.
The code becomes shorter and cleaner.
As each content page references which template file to use, it is easy to use different templates for different areas of the application (e.g. public area and admin area).
The layout for admin portal is designed as follows :![]()
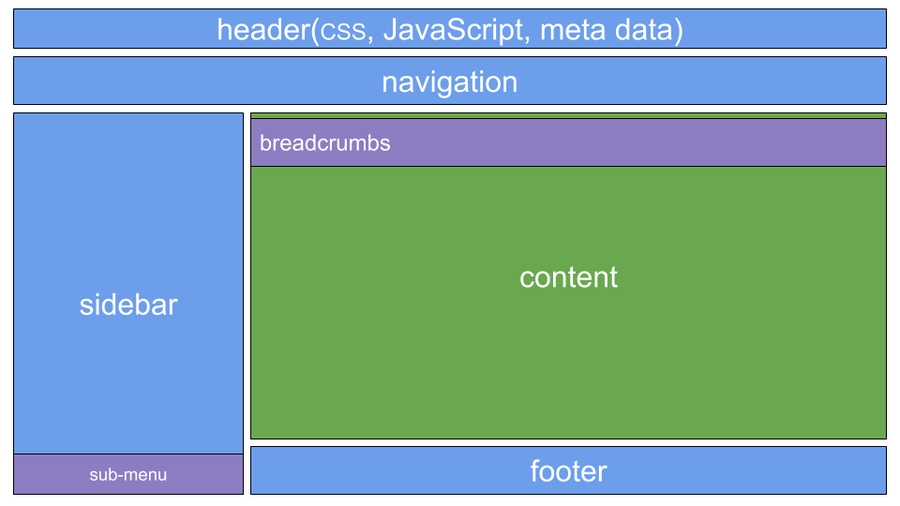 Blog Like Layout
The individual areas in this layout serve the following purpose :
Header : this fragment is used for the static imports (CSS and JavaScript), the title and meta tags.
Navigation : the navigation bar with user profile at top right.
Content : the content placeholder that will be replaced by the requested page.
Sidebar : a sidebar for additional information.
Footer : the footer area that provides the copyright info.
These components can be located in the resources/templates directory at the root as well as under the sub-directories fragments and layout. The content area in this layout will host the following pages :
Dashboard
Agency
Bus
Trip
Profile
Also, an error page for any unhandled exception is designed with the name “error.html”. The login and signup pages are designed separately from the portal accessible to a logged-in user.
Running the Server Locally
To be able to run this Spring Boot app you will need to first build it. To build and package the Spring Boot app into a single executable Jar file with a Maven, use the below command. You will need to run it from the project folder which contains the pom.xml file.
or you can also use
To run the app from a terminal window you can you the java -jar command. This is provided your Spring Boot app was packaged as an executable jar file.
You can also use Maven plugin to run the app. Use the below example to run your Spring Boot app with Maven plugin :
You can follow any/all of the above commands, or simply use the run configuration provided by your favourite IDE and run/debug the app from there for development purposes. Once the server is setup you should be able to access the admin interface at the following URL :
And the REST APIs can be accessed over the following base-path :
Some of the important api endpoints are as follows :
http://localhost:8080/api/v1/user/signup (HTTP:POST)
http://localhost:8080/api/auth (HTTP:POST)
Docker Container
Please use the following command to build the container image :
And the following command to run the container :
Please note when you build the container image and if mongodb is running locally on your system, you will need to provide your system’s IP address (or cloud hosted database’s IP) in the application.properties file (or env vars) to be able to connect to the database from within the container.
Last updated
Was this helpful?